After the OS boots: the first 30 minutes on a new cloud VM
I still remember the first time I treated a brand-new cloud VM like a local laptop. Spun up Ubuntu 22.04 on a cheap instance, logged in with the password the provider emailed me, ran apt update && apt upgrade -y, installed a bunch of tools, and walked away. Four hours later the auth logs looked like a dictionary-attack museum. Hundreds of root login attempts from IPs I’d never seen. The box was still up, but only because the attackers hadn’t found the password yet. That was the last time I ever left password authentication enabled past the first SSH session.
These days the first 30 minutes after the OS is up follow a pretty fixed sequence. Not a compliance checklist. Just the minimum set of moves that stop the most common ways a fresh instance gets owned or starts bleeding money before you’ve even deployed anything.
Get in with a key and kill password auth before anything else
Most providers let you inject an SSH public key at launch. Use that. If you didn’t, paste one in now while you still have console access.
# On your laptop
ssh-keygen -t ed25519 -C "ops@$(hostname)" -f ~/.ssh/cloud-ed25519 -N ""

# Then on the new VM (still using the temporary password or cloud console)
mkdir -p ~/.ssh
chmod 700 ~/.ssh
echo "ssh-ed25519 AAAAC3NzaC1lZDI1NTE5AAAAI... your-key-here" >> ~/.ssh/authorized_keys
chmod 600 ~/.ssh/authorized_keys
Once that works, immediately edit sshd_config. I do it in this order so I don’t lock myself out:
# Keep a second terminal open with an active root session
cp /etc/ssh/sshd_config /etc/ssh/sshd_config.bak.$(date +%s)

# Prefer these settings on Ubuntu 22.04/24.04
cat <<'EOF' > /etc/ssh/sshd_config.d/99-hardening.conf
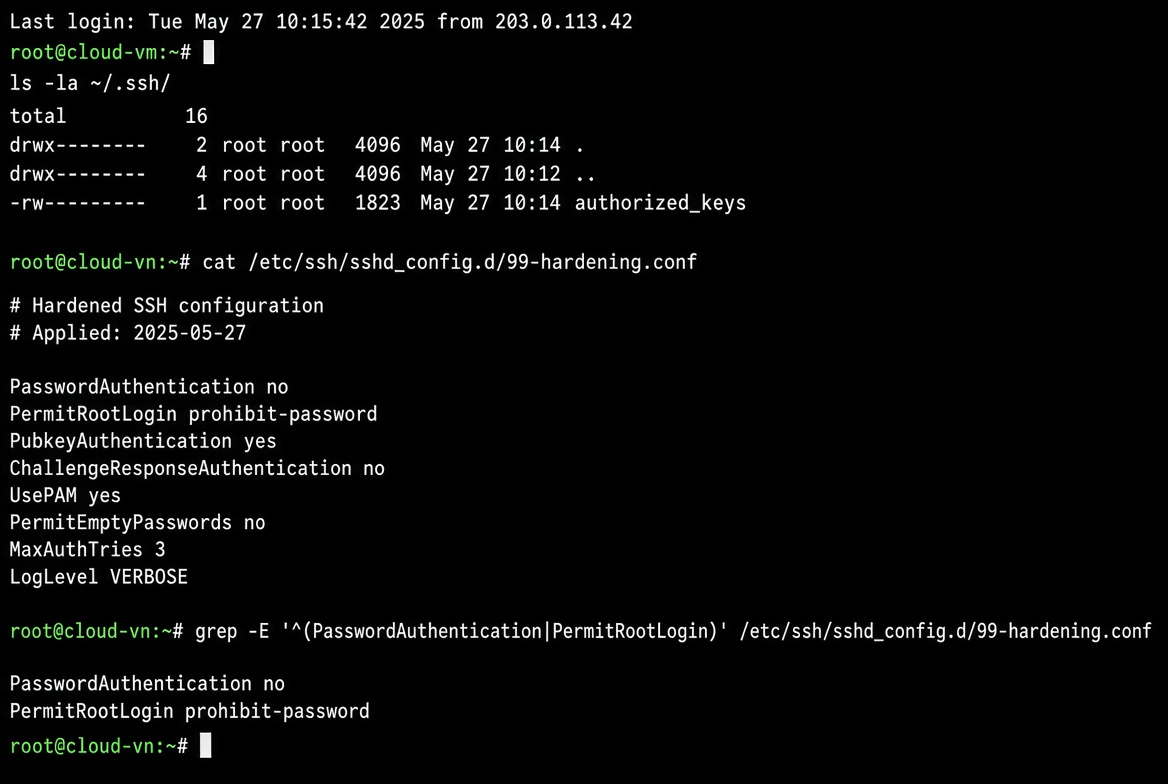
PasswordAuthentication no
PermitRootLogin prohibit-password
PubkeyAuthentication yes
KbdInteractiveAuthentication no
ChallengeResponseAuthentication no
UsePAM yes
X11Forwarding no
AllowAgentForwarding no
AllowTcpForwarding no
ClientAliveInterval 300
ClientAliveCountMax 2
MaxAuthTries 3
LoginGraceTime 20
EOF

sshd -t && systemctl reload ssh
If the test fails, the reload never happens and your existing session stays alive. I learned that the hard way after one too many systemctl restart ssh while the only key I had was on a different laptop.
After reload, open a new terminal and confirm you can still get in with the key. Only then close the old session. You’ll see something like this in the successful login:
That single change removes the entire class of credential-stuffing attacks that hit every public IP within minutes of launch. On a quiet day the auth.log still shows a few dozen failed attempts from scanners; on a noisy day it can be thousands. With password auth disabled those attempts become pure noise instead of a potential entry point.
One more practical note: if you ever need to re-enable password auth temporarily (cloud console rescue, broken key, whatever), do it from a live session, make the change, test, then turn it back off. Leaving it on “just for a few hours” is how most of the incidents I’ve cleaned up actually started.
Firewall: ufw is good enough for the first week
Cloud security groups are the outer wall. ufw is the inner one. I always set both. The security group should already be restricted to my current IP (or the office range) for port 22. Inside the guest I still run:
apt-get update -qq
apt-get install -y ufw

ufw default deny incoming
ufw default allow outgoing
ufw allow OpenSSH
# If you already changed the SSH port, use the new number instead
# ufw allow 2222/tcp

ufw --force enable
ufw status verbose
The --force is intentional. On a brand-new box there is no existing policy to fight with, and I don’t want an interactive prompt when I’m scripting this later.
One thing people forget: if you later open port 80/443 for a web service, do it in both places. I’ve seen more than one “why is nginx not reachable” ticket that turned out to be the security group still only allowing 22.
Here’s the dual view I keep in mind — cloud console security group on the left, local ufw on the right. They must agree on the high-level ports, but the security group is the one that actually stops packets from ever reaching the NIC.
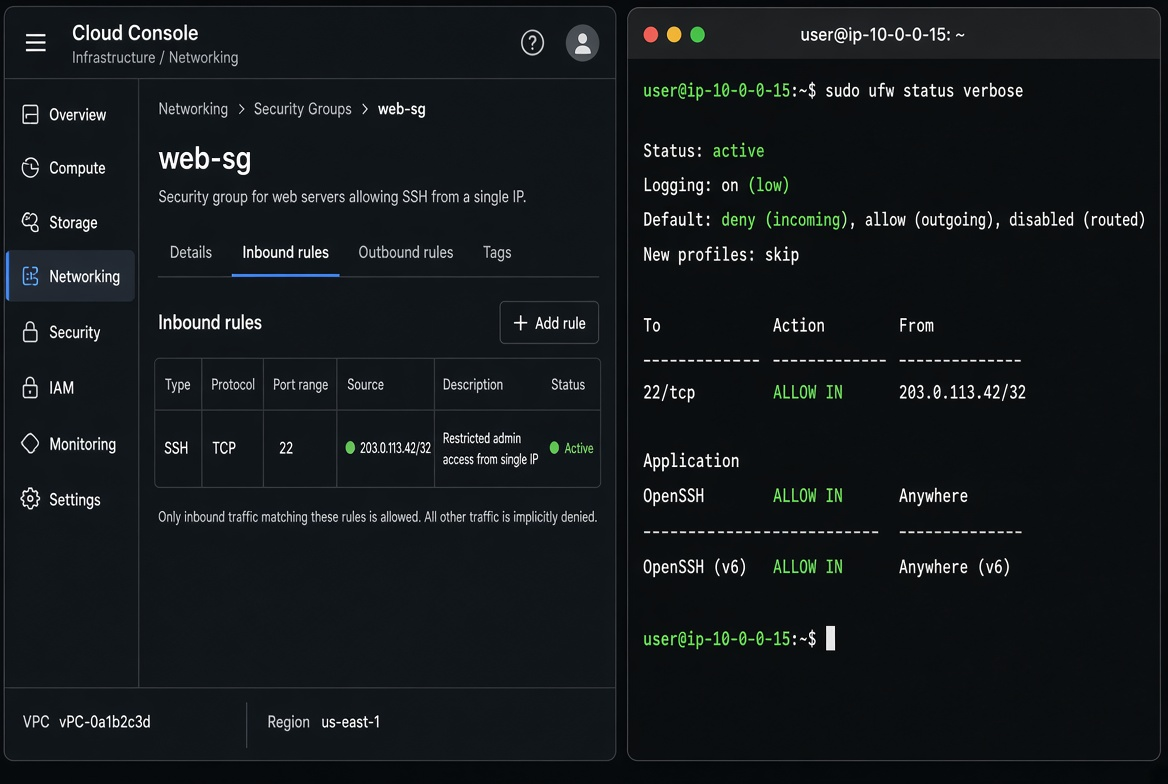
I treat the security group as the real gate. ufw is mostly there for defense-in-depth and for the day when someone (or some automation) opens a port in the wrong place. If the two disagree, fix the security group first.
Timezone and NTP before any logs or certificates
Default Ubuntu cloud images often come up in UTC. That’s fine for servers, but if your team is mostly in one region it becomes painful when you’re correlating logs with human reports. More importantly, TLS certificates and some backup tools care about correct time.
# Pick the zone that matches where most of the team sits, or keep UTC if the fleet is global
timedatectl set-timezone Asia/Shanghai   # or America/Los_Angeles, Europe/Berlin, etc.

# Make sure systemd-timesyncd is happy
timedatectl status
systemctl status systemd-timesyncd --no-pager
If the image is minimal and timesyncd isn’t there, install chrony instead. Either way, get the clock within a few seconds of reality before you start generating any long-lived credentials or looking at audit logs. I’ve debugged more than one “certificate not yet valid” error that was just the VM still living in 1970 because cloud-init hadn’t finished or the metadata service was slow.
A quick sanity check I run after the change:
date
timedatectl show -p NTPSynchronized --value
# expect yes
Unattended security updates — turn them on and then forget about them
I used to disable automatic upgrades because “I want control.” Then I spent a weekend patching a zero-day across thirty boxes that should have already been covered. Now I leave the defaults on and only override when a specific package needs pinning.
apt-get install -y unattended-upgrades apt-listchanges

# Ubuntu’s default config is already sensible. Just make sure it’s enabled.
dpkg-reconfigure -plow unattended-upgrades

# Quick check
cat /etc/apt/apt.conf.d/20auto-upgrades
# Should contain:
# APT::Periodic::Update-Package-Lists "1";
# APT::Periodic::Unattended-Upgrade "1";
On 24.04 the package is usually already present. The only extra I sometimes add is a short blacklist for packages that break things when they update themselves (docker, certain kernel modules). For a brand-new general-purpose VM I leave the blacklist empty.
You can also watch what it actually did later with:
grep -i unattended /var/log/unattended-upgrades/unattended-upgrades.log | tail -20That’s usually enough to confirm the mechanism is alive without turning the box into a full monitoring project on day one.
Create a normal user and stop living as root
Root is fine for the first 15 minutes. After that it’s just a larger blast radius.
adduser --disabled-password --gecos "" deploy
usermod -aG sudo deploy

# Copy the same authorized key
mkdir -p /home/deploy/.ssh
cp /root/.ssh/authorized_keys /home/deploy/.ssh/
chown -R deploy:deploy /home/deploy/.ssh
chmod 700 /home/deploy/.ssh
chmod 600 /home/deploy/.ssh/authorized_keys

# Optional but recommended: force the deploy user to use sudo without password for the first week
echo "deploy ALL=(ALL) NOPASSWD:ALL" > /etc/sudoers.d/deploy
chmod 440 /etc/sudoers.d/deploy
Then log in as deploy and confirm sudo works. Once that session is solid I can drop the root key from authorized_keys if I want, or leave it as a break-glass option. Most of the time I leave root’s key in place but keep PasswordAuthentication off.
One-shot script that does the boring parts
After doing this by hand a few dozen times I finally put the non-interactive pieces into a single script. I still run the SSH key and sshd_config steps manually the first time (because locking yourself out is expensive), then drop this on the box.
#!/bin/bash
# first30.sh — run as root after key-based SSH is confirmed working
set -euo pipefail

export DEBIAN_FRONTEND=noninteractive

echo "[*] Installing baseline packages"
apt-get update -qq
apt-get install -y ufw unattended-upgrades apt-listchanges curl jq

echo "[*] Configuring ufw"
ufw default deny incoming
ufw default allow outgoing
ufw allow OpenSSH
ufw --force enable

echo "[*] Enabling unattended upgrades"
cat > /etc/apt/apt.conf.d/20auto-upgrades <<EOF
APT::Periodic::Update-Package-Lists "1";
APT::Periodic::Unattended-Upgrade "1";
APT::Periodic::AutocleanInterval "7";
EOF

echo "[*] Setting timezone (change this line)"
timedatectl set-timezone UTC

echo "[*] Creating deploy user if missing"
if ! id deploy &>/dev/null; then
  adduser --disabled-password --gecos "" deploy
  usermod -aG sudo deploy
  mkdir -p /home/deploy/.ssh
  cp /root/.ssh/authorized_keys /home/deploy/.ssh/
  chown -R deploy:deploy /home/deploy/.ssh
  chmod 700 /home/deploy/.ssh
  chmod 600 /home/deploy/.ssh/authorized_keys
  echo "deploy ALL=(ALL) NOPASSWD:ALL" > /etc/sudoers.d/deploy
  chmod 440 /etc/sudoers.d/deploy
fi

echo "[*] Done. Log in as deploy and verify."
echo "    Next: review cloud security group, then decide on monitoring and backups."
When it finishes you should see something close to this (the exact package list and times vary):
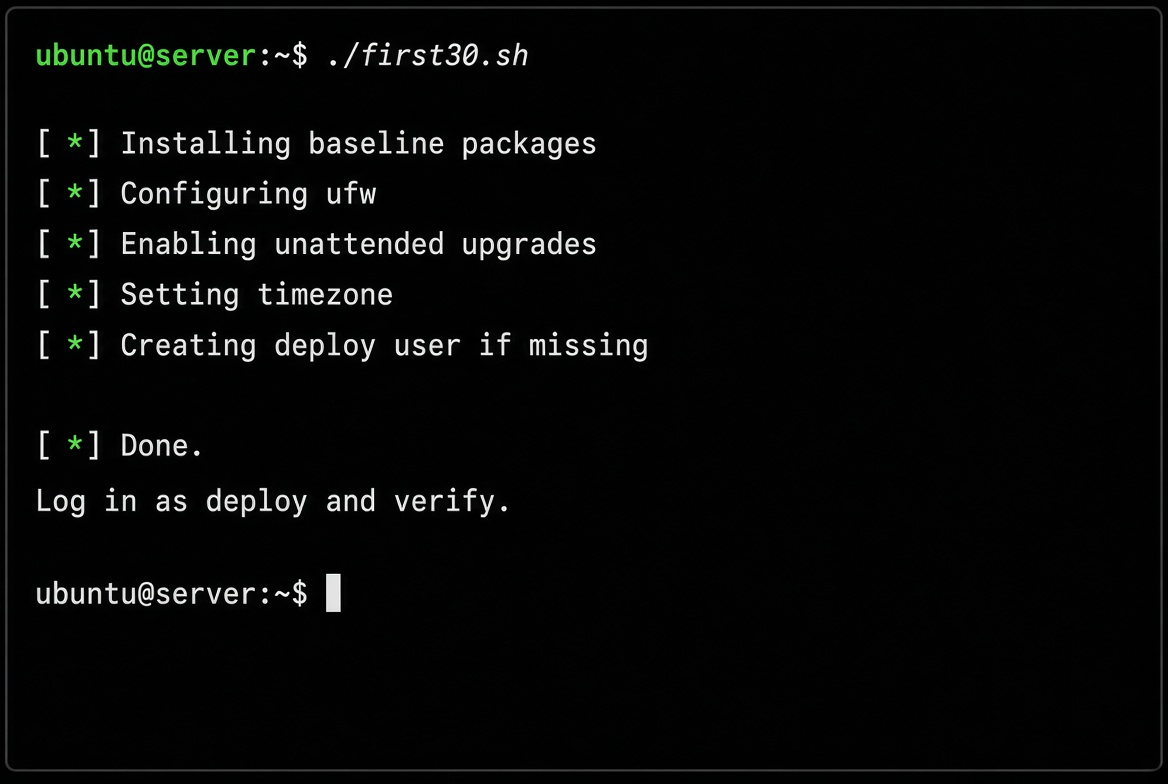
I keep a slightly longer version that also installs fail2ban and sets a non-standard SSH port, but for the pure first-30-minutes version the above is enough. It doesn’t touch sshd_config because that step is the one place I still want a human in the loop.
What this actually buys you
After these steps the instance is no longer the default soft target. Password auth is gone, the firewall is on, time is correct, security updates will land without me watching, and there’s a non-root account ready for day-to-day work. The cloud security group still needs to be tightened to the real source IPs, and I still need to decide what the box is actually for, but the “freshly exposed public IP” phase is over.
One side effect I didn’t expect when I started doing this religiously: the first month’s unexpected egress charges dropped. Not because the hardening itself saves bandwidth, but because I stop getting the random crypto-miners and spam relays that used to appear on any box left with weak credentials. Those things generate outbound traffic that shows up on the bill long before you notice the CPU spike.
If you’re about to stand up a whole fleet, the same sequence becomes an Ansible role or a cloud-init snippet. For a single VM that just appeared five minutes ago, the manual path above is still the fastest way to not regret the next four weeks.
Once the box is in this state I usually run a quick ss -tlnp and a ufw status, then move on to whatever the actual workload is. The first 30 minutes are done. Everything after that is application-specific.
One last habit that saves time later: right after the script finishes I take a 30-second snapshot of the current state.
# quick post-hardening snapshot
{
  echo "=== $(date -Is) ==="
  uname -a
  timedatectl
  ufw status verbose
  ss -tlnp
  id deploy
  grep -E 'PasswordAuthentication|PermitRootLogin' /etc/ssh/sshd_config /etc/ssh/sshd_config.d/* 2>/dev/null
} > /root/first30-$(date +%Y%m%d).txt
I almost never look at that file again, but the few times I have needed it (new team member, audit question, “did we ever turn on unattended upgrades on that old box?”) it has been worth the ten seconds.
And if the next thing you deploy starts talking to the internet a lot, drop the expected traffic numbers into the Egress calculator before you open the ports. It’s cheaper to find out the transfer cost while the security group is still locked down.